
Kinesiology Taping is a revolutionary injury prevention and rehabilitation technique taking the world of professional sport by storm. If you're reading this you're probably familiar with how it works, but if not check out our handy blog - Kinesiology Taping: What's It All About? Whether you’re rehabilitating a strained muscle, managing shin splints, or aiming to improve posture during long runs, this flexible tape can be a game-changer.
What Is Kinesiology Tape?
Kinesiology tape is a revolutionary tool in sports medicine and rehabilitation, specifically designed to provide support to muscles and joints without restricting movement. Unlike traditional athletic tape, which is rigid and meant to immobilise, kinesiology tape is made from a flexible, cotton-based material with an elastic quality that closely matches the elasticity of human skin. This unique feature allows athletes, runners, and individuals recovering from injuries to maintain their full range of motion while still benefiting from gentle support.
The tape is also hypoallergenic and water-resistant, making it suitable for use during showers or even swimming. Its adhesive is strong enough to stay in place for several days, yet gentle enough to be removed without causing irritation.
Available in a variety of colors, the tape has become a popular accessory among athletes who appreciate both its therapeutic benefits and its ability to add a splash of color to their kit. While the color choices are purely aesthetic and do not affect performance, many runners enjoy matching their tape to their running gear for a coordinated look.

How Does Kinesiology Tape Work?
The effectiveness of kinesiology tape stems from its ability to create a subtle lifting effect on the skin. When applied correctly, the tape gently lifts the skin away from the underlying tissues, which helps to decompress pressure on pain receptors and improve blood flow and lymphatic drainage. This micro-lifting action is believed to reduce pain and swelling by allowing more space for fluid movement and by disrupting pain signals sent to the brain.
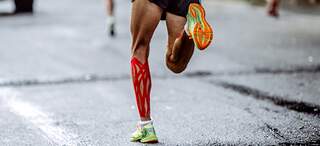
Additionally, kinesiology tape provides proprioceptive feedback, meaning it helps the body become more aware of its position and movement. This feedback can improve muscle activation and coordination, which is especially beneficial for runners who rely on precise muscle control for efficient movement and injury prevention. The tape’s elasticity also supports joints and muscles during activity, offering stability without the rigidity of traditional tape. For runners, this means less risk of overuse injuries and improved performance, especially during long-distance events or intense training sessions.


Step-by-Step Guide to Applying Kinesiology Tape
Before you tape
Find a marker that elicits the problem or pain you want to tape. If this taping is done right it should give an instant improvement in this marker. It could be something specific like an empty can or grip strength test. Where possible I try to use something simple and functional like a squat, sit to stand or arm elevation. This way both you and the patient can see and appreciate the change. The mantra is; Test. Tape. Test again.
Skin preparation
- Make sure the area you want to tape is clean and dry (oils, creams, sweat etc all stop the tape from sticking well).
- If hair is thick enough to prevent tape adhering well shave the area first.
Pain reduction taping protocol
This simple 2 strip taping is a great way to reduce pain and improve regional function. It can be used almost anywhere on the body to help a whole bunch of problems from tennis elbow to plantar fasciitis.
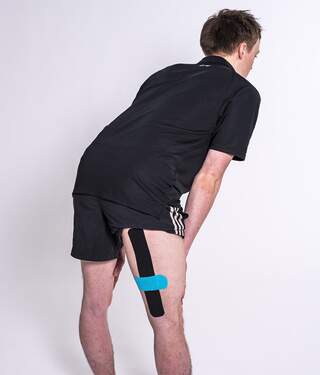
- Cut 1 long strip (Stabilisation). As a rough guide it should be the length of the structure you want to tape. For example: To tape for tennis elbow it should be the length of the Wrist extensors. To tape Lateral knee pain it should be the length of the ITB)
- Cut a shorter strip (Decompression). About 10-20cm depending on the size of the body/ area you want to tape.
- Round the ends of each tape. This is not cosmetic, by removing the sharp angles it helps to tape to stick longer.
Application
- Stretch the tissue in the area you want to tape as much as possible.
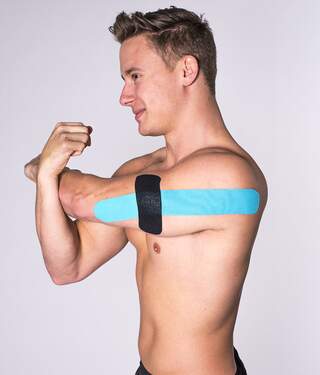
- Take the long strip. Tear the backing paper close to one end and stick the end down with no stretch on the tape. Peel the backing paper away as you stick the tape in line with the tissue with just the amount of stretch that is already on the tape. (Blue strip)
- Take the short piece of tape tear the paper in the middle and peel it back so ½ the tape is exposed, stretch it a little (approx. 50% stretch) and lay it like a plaster right over the sore bit roughly perpendicular to the first bit. (Pink/Black strip)
- Always lay the first and last 3-5cm of tape with no stretch at all.
- Rub the tape all over before you start moving about to activate the glue.
Pro Tips for Maximising Results with Kinesiology Tape
To get the most out of kinesiology tape, it’s important to follow a few best practices. Timing is key—applying the tape 30 to 60 minutes before exercise allows the adhesive to set properly and ensures the tape stays in place during activity. Avoid using too many overlapping strips, as this can restrict natural movement and reduce the tape’s effectiveness. After application, it’s best to wait at least an hour before swimming or showering to give the adhesive time to bond with the skin. The tape can typically be worn for three to five days, but it should be replaced regularly to prevent skin irritation and maintain optimal support.
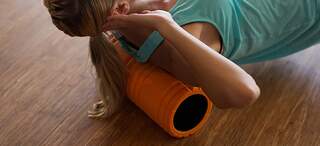
Combining kinesiology tape with other therapies, such as foam rolling, stretching, or physiotherapy, can enhance overall recovery and performance. By following these tips, runners can maximize the benefits of kinesiology tape and enjoy a more comfortable, injury-free running experience.

FAQs
Kinesiology tape is typically made from high-quality cotton with a hypoallergenic acrylic adhesive. It’s latex-free and designed to be breathable and water-resistant.
Most tapes can be worn for 3–7 days, depending on the area and your activity level. If it starts to peel or causes discomfort, remove it.
Yes, most kinesiology tapes are water-resistant and can be worn while bathing, swimming, or sweating
Research is ongoing, but many people report benefits such as pain relief, reduced swelling, and improved function. It’s most effective when used alongside other treatments and under professional guidance.
Generally, yes, but avoid using it on broken skin, if you have allergies to adhesives, or if you have certain medical conditions. Consult a healthcare professional if unsure.
The different colours are mainly for aesthetics or personal preference. The therapeutic effect is the same regardless of colour.
For simple applications, yes, but for more complex injuries or conditions, it’s best to seek professional advice to ensure correct technique and maximum benefit.
Related Articles

Let us know you agree to cookies
We use marketing, analytical and functional cookies as well as similar technologies to give you the best experience. Third parties, including social media platforms, often place tracking cookies on our site to show you personalised adverts outside of our website. We store your cookie preferences for two years and you can edit your preferences via ‘manage cookies’ or through the cookie policy at the bottom of every page. For more information, please see our cookie policy.